


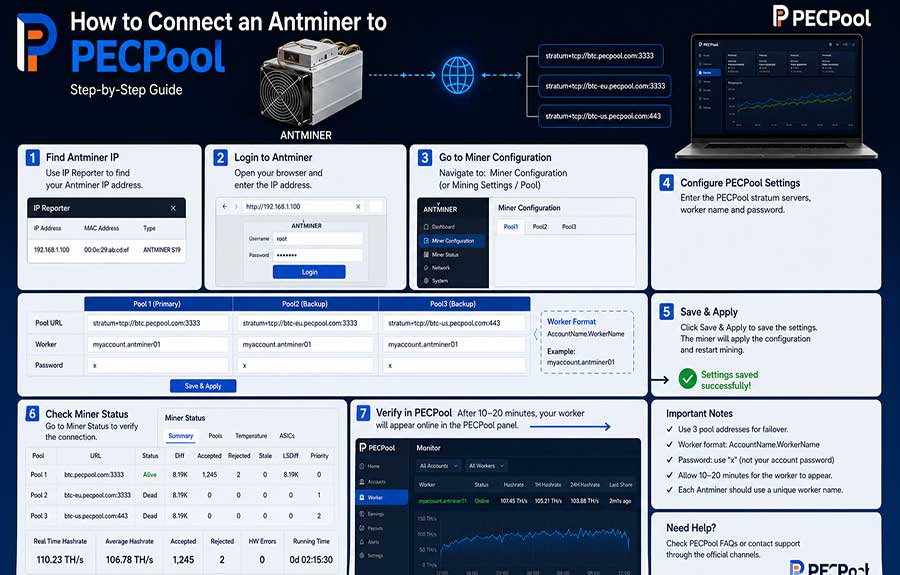
Learn how to connect a Bitmain Antminer to PECPool, find the miner’s IP address, access its management interface, configure three PECPool stratum servers, create a unique worker name, verify accepted shares, and troubleshoot common connection problems.
Bitmain Antminer devices can connect directly to PECPool using the miner’s built-in web management interface.
You do not need to install mining software on a separate computer. After entering the PECPool stratum addresses and your worker information, the Antminer connects to the pool and begins submitting Bitcoin mining shares automatically.
This guide applies to Bitcoin SHA-256 Antminer devices, including many models from the Antminer S and T series. Menu names and interface layouts may vary slightly depending on the model and firmware version.
Before configuring your Antminer, make sure you have:
Antminers normally use a wired Ethernet connection. Connect the miner directly to a router or network switch using a reliable network cable.
Before powering on the miner, verify that:
Incorrect voltage, loose power cables, poor ventilation, or blocked fans may damage the device.
Sign in to the official PECPool control panel:
https://cp.pecpool.comhttps://cp.pecpool.ccOpen the Accounts section and locate the mining account that you want to use.
Your mining account name will be used in the Antminer’s Worker field.
The mining account is not the same as:
Copy the account name exactly as displayed in the panel.
If you manage multiple mining accounts, make sure you select the correct account before configuring the miner.
A worker name identifies an individual Antminer under your PECPool mining account.
The recommended format is:
AccountName.WorkerName
Example:
myaccount.antminer01
For multiple Antminers, use a different worker name for every device:
myaccount.antminer01myaccount.antminer02myaccount.antminer03You may also name workers based on their physical location:
myaccount.rack01amyaccount.room2miner05myaccount.siteb01Use short and recognizable names. Avoid spaces and unnecessary special characters.
Using a unique worker name for each Antminer allows you to monitor its hashrate, uptime, accepted shares, connection status, and possible problems separately.
The worker will normally be created automatically in PECPool after the miner begins submitting valid shares. You do not usually need to create it manually in advance.
Connect an Ethernet cable from the Antminer to your router or network switch.
Then connect the required power cables and turn on the miner.
Wait until the control board has completed its startup process. Depending on the model and firmware, this may take several minutes.
The miner and the computer used for configuration must normally be connected to the same local network.
For example:
192.168.1.1192.168.1.20192.168.1.100The exact addresses on your network may be different.
You need the Antminer’s local IP address to open its management interface.
Several methods can be used.
Bitmain provides the IP Reporter utility for locating supported Antminer devices on a local network.
General process:
Your computer and Antminer must be connected to the same network for this method to work.
Open your router or DHCP server management page and view the connected devices or DHCP client list.
Look for a device identified as:
A trusted local network scanner can also be used to find active devices.
Before using this method, make sure the software is obtained from a reputable source and is used only on a network you are authorized to manage.
Enter the miner’s IP address in a web browser.
Example:
http://192.168.1.100
A login window should appear.
On some factory-default Antminer firmware versions, the default credentials may be:
rootrootHowever, credentials may vary depending on:
Use the credentials provided with your miner or set by your network administrator.
After signing in, change the default administrator password whenever the firmware provides that option. Do not expose the Antminer management page directly to the public internet.
The pool settings menu may have a different name depending on the Antminer model and firmware.
Common names include:
Open the section that contains the following fields:
Most Antminers provide three separate pool configurations:
Bitmain uses these entries as priorities. The miner normally connects to Pool 1 first. If Pool 1 becomes unavailable, it can switch to Pool 2 and then Pool 3.
PECPool recommends configuring all three stratum addresses to reduce mining interruptions and provide a backup connection.
PECPool provides regional Bitcoin stratum servers.
Select the nearest and most stable server as Pool 1, then configure alternative addresses as Pool 2 and Pool 3.
| Region | Server | Available Ports |
|---|---|---|
| Global | btc.pecpool.com | 3333, 443, 25 |
| United States | btc-us.pecpool.com | 3333, 443, 25 |
| Europe | btc-eu.pecpool.com | 3333, 443, 25 |
| Russia | btc-ru.pecpool.com | 3333, 443, 25 |
| Asia | btc-as.pecpool.com | 8443, 443, 25 |
| Iran | btc-ir.pecpool.com | 8443, 443, 25 |
| Iran Alternative | btc.pecpool.cc | 8443, 443, 25 |
The complete address format is:
stratum+tcp://server-address:port
Example:
stratum+tcp://btc-eu.pecpool.com:3333
Use the server order recommended in the PECPool panel for your location whenever available.
Enter one PECPool server in each Pool URL field.
Use the same PECPool mining account and worker name for all three pool entries.
URL
stratum+tcp://btc-eu.pecpool.com:3333
Worker
myaccount.antminer01
Password
x
URL
stratum+tcp://btc.pecpool.com:443
Worker
myaccount.antminer01
Password
x
URL
stratum+tcp://btc-us.pecpool.com:25
Worker
myaccount.antminer01
Password
x
URL
stratum+tcp://btc.pecpool.cc:8443
Worker
myaccount.antminer01
Password
x
URL
stratum+tcp://btc-as.pecpool.com:443
Worker
myaccount.antminer01
Password
x
URL
stratum+tcp://btc-eu.pecpool.com:3333
Worker
myaccount.antminer01
Password
x
The Pool Password field is not your PECPool login password.
Never enter any of the following in the pool password field:
When no special pool password is required, x can be used as the standard placeholder.
Carefully review all three pool entries.
Make sure:
stratum is spelled correctly.Click one of the following buttons, depending on the firmware:
Some Antminers restart the mining process automatically after saving. Other firmware versions may require a manual restart.
Do not repeatedly power the miner off and on while it is applying the configuration.
Open the Antminer status page after saving the configuration.
The page may be named:
Allow several minutes for the miner to initialize the hashboards and establish a pool connection.
Check the following items:
The selected PECPool server should appear as:
The exact status name depends on the firmware.
The Antminer should begin displaying hashrate after the hashboards initialize.
Do not evaluate the miner only from the first few minutes. Average hashrate is more useful than a rapidly changing real-time value.
The accepted share counter should begin increasing after a successful connection.
This is one of the most important signs that the Antminer is mining correctly.
A small number of rejected or stale shares may occasionally occur.
A consistently high rejection rate should be investigated.
Verify that all expected hashboards or chains are detected.
For example, if the model contains three hashboards, the status page should normally display all three.
Check that:
Return to the PECPool panel and open Monitor.
Select the mining account used in the Antminer configuration.
After the miner begins submitting valid shares, the worker should normally appear in the panel within approximately 10 to 20 minutes.
Check:
The hashrate shown in PECPool may initially differ from the hashrate displayed in the Antminer interface.
This is normal because:
Allow sufficient time for the pool average to stabilize.
The three Pool fields are not used simultaneously for normal mining.
The Antminer normally uses them in priority order:
When Pool 1 is working normally, Pool 2 and Pool 3 may appear inactive, standby, dead, or unused depending on the firmware.
This does not necessarily indicate a problem.
The important point is that the miner can connect to each backup server when required.
Check the following:
Also check the router’s DHCP client list.
If the miner previously used a static IP address from another network, it may not receive a new address automatically.
A factory reset may be required in some situations, but this should only be performed after recording existing settings and reviewing the correct procedure for the exact Antminer model.
Possible causes include:
Try:
http:// and https:// if supported.A Dead pool status means the Antminer cannot establish or maintain a connection to the selected server.
Check:
Try another official PECPool server or port.
For example, if port 3333 is restricted, try port 443 or another supported port for the selected region.
Do not use unofficial server addresses received through private messages.
If the server is reachable but no accepted shares appear, check:
Confirm that the Antminer is a Bitcoin SHA-256 model.
An Antminer designed for a different mining algorithm cannot mine Bitcoin simply by changing the pool address.
Authorization problems are commonly caused by:
Use the worker format shown by PECPool:
AccountName.WorkerName
Example:
myaccount.antminer01
A powered-on Antminer is not necessarily connected to the pool.
The worker may remain offline if PECPool is not receiving valid shares.
Check:
After correcting the configuration, wait approximately 10 to 20 minutes for the worker status to update.
Temporary differences are expected.
Possible reasons include:
Review the one-hour and twenty-four-hour averages rather than only the current value.
Possible causes include:
To reduce rejected shares:
This is normally a hardware or firmware issue rather than a PECPool connection problem.
Check:
Do not continue restarting the miner repeatedly if a hardware fault is suspected.
Follow the official Bitmain troubleshooting procedure for the exact model or contact a qualified repair technician.
Frequent restarts may be caused by:
Review the kernel log and power environment before assuming the mining pool is responsible.
After completing the setup:
The Antminer management password only protects the local miner interface. It is separate from the PECPool account password.
Before considering the Antminer setup complete, confirm that:
Once the active PECPool server is shown as connected and accepted shares are increasing, your Antminer is successfully submitting mining work to PECPool.
Continue monitoring:
For greater reliability, always configure all three official PECPool stratum addresses and assign a unique worker name to every Antminer.
Copyright ©2026 PECPool.